
Combat
Ranged attacks and Cast actions that select an enemy target require line of sight unless a rule says otherwise. (See Actions.)
Targeting, Line of Sight, and Cover
Line of Sight and Cover
Ranged attacks and Cast actions that select an enemy target require line of sight unless a rule says otherwise. (See Actions.)
A Downed or Stunned fighter cannot be selected as the target of a Ranged attack or hostile Cast action while any Active enemy fighter is otherwise an eligible target for that attack or spell. Check range, line of sight, and any other targeting restrictions before determining whether another fighter is eligible.
Judge from the firing fighter's point of view (stoop to the firing fighter's height if needed). Use the target's body on and above its base. Ignore any part extending past the edge of the base (weapons, banners, cloaks, etc.).
Line of sight
If you can see the target from the firing fighter's viewpoint, you have line of sight.
Friendly fighters do not block line of sight. Enemy fighters block line of sight normally.
Some special rules — such as the Smoke keyword — block line of sight completely. When a target's line of sight is completely blocked, they cannot be declared as the target of a Ranged attack or Cast action. This is distinct from cover, which provides a bonus die but still allows targeting. See Alchemical Bombs.
Cover
If any intervening terrain lies between the firing fighter and the target — and that terrain is more than 1" from the firing fighter — the target has cover.
Cover grants +1 Skill defense die (rolled with Skill) when the defender rolls defense against a Ranged attack or a spell that resolves using the standard Attack Sequence.
If the target is within 1" of the intervening terrain, cover grants +2 Skill defense dice instead.
Intervening Fighters
Friendly fighters
Friendly fighters (same retinue) do not block line of sight.
Fighters may move through friendly fighters during Move, Charge, Scramble, Climb, and Jump actions. They cannot end their movement on another fighter's base.
Friendly fire
An Active friendly fighter is at risk when making any Ranged attack if:
- Their base lies on the straight line between the attacker's base center and the target's base center, or
- They are within engagement range of the declared target.
When a friendly is at risk, any die in the Strike Pool that shows a natural 1 is a hit on the nearest at-risk friendly instead of the declared enemy target. Resolve each such die as 1 hit from that weapon against that friendly (defense rolls apply normally). The remaining Strike Pool dice resolve normally against the declared target.
Downed and Stunned friendly fighters are never at risk from friendly fire.
If more than one friendly is at risk, the one closest to the attacker (base to base) takes the hit. On a tie, the attacking player selects.
Clustered enemies
When declaring a target for a Ranged attack or Cast action, if one or more other enemy fighters from the same retinue are within 1" of the declared target, the attacker must pass a Skill check to hit the intended target.
- Pass: Resolve the attack against the declared target.
- Fail, one other fighter within 1": That fighter becomes the new target instead.
- Fail, two or more other fighters within 1": Randomly select the new target from all enemy fighters within 1" of the declared target (including the declared target).
Make the Skill check when the target is declared, before rolling the attack.
Range
Ranged weapons and spells have a minimum range and a maximum range.
- A target closer than the minimum range cannot be targeted.
- A target beyond the maximum range cannot be targeted.
Unless otherwise noted, ranged weapons have a minimum range of 3".
Attack Sequence
Before Step 1, declare a valid enemy target. Clustered enemies and friendly fire may affect the attack — see Intervening Fighters.
Attack Sequence
Step 1 — Build the Strike Pool: Read the attack's weapon or spell profile. A number with a
+adds to the attacker's matching attribute; a number without a+is fixed. The Strike Pool cannot exceed 15 dice.Step 2 — Roll to hit: Melee dice use Close Combat checks. Ranged dice use Ranged Combat checks. Apply Hit attribute modifiers (+1 Close Combat, −1 Ranged Combat, etc.) to the attribute used for that attack.
Step 3 — Determine criticals: Weapon triangle (attacker only), magic triangle, Aim, or firearms (crits vs all). Critical hits cannot be blocked.
Step 4 — Roll defense: Build the defense pool: defender Might + Skill, modified by armor (Light Armor +1 Sk, Medium Armor +1 Mt, Heavy Armor +2 Mt −1 Sk), plus any bonus dice from cover, Brace, spells, feats, or scenario rules. Shields modify the Df threshold on specific dice. Roll all dice as Df checks. Attacker wins ties. (See Equipment.)
Step 5 — Apply Wounds: See Apply Wounds (below).
Step 1: Build the Strike Pool
The Strike Pool is the mix of Might dice and Skill dice the attacker rolls to hit. Weapon and spell profiles list the dice the attack uses.
- A number with a
+adds to the attacker's matching attribute. A profile with +1 Might uses the attacker's Might + 1 Might die. - A number without a
+is fixed. A profile with 4 Skill uses exactly 4 Skill dice, no matter the attacker's Skill. - A dash adds no dice.
Some ranged weapons and damage spells mix these values. A Shortbow uses the archer's Might plus fixed Skill dice. A Crossbow, firearm, or damage spell uses fixed Might dice plus the attacker's Skill and any printed +Skill value.
After all weapon bonuses and other dice bonuses are applied, a Strike Pool cannot contain more than 15 dice. If the pool would exceed 15 dice, the attacking player chooses which Might dice or Skill dice to remove until 15 dice remain.
A fighter attacking unarmed uses only their base Might and Skill.
Example
| Weapon | Type | Range | +Mt | +Sk |
|---|---|---|---|---|
 Sword Sword |
Melee | Engagement | +1 | +1 |
A Keen fighter (Might 3, Skill 4) with a Sword: (3+1) Might + (4+1) Skill = 4 Might + 5 Skill = 9 dice
| Fighter | Base Mt | Base Sk | Weapon | Might | Skill | Total |
|---|---|---|---|---|---|---|
| Steady (Mt 3, Sk 3) | 3 | 3 | Sword (+1 Mt, +1 Sk) |
4 | 4 | 8 |
| Keen (Mt 3, Sk 4) | 3 | 4 | Shortbow (+1 Mt, 4 Sk) | 4 | 4 | 8 |
| Stout (Mt 4, Sk 3) | 4 | 3 |  War Axe (+2 Mt) War Axe (+2 Mt) |
6 | 3 | 9 |
| Stunty (Mt 2, Sk 4) | 2 | 4 | Throwing Stars (+1 Sk) | 2 | 5 | 7 |
Step 2: Roll to Hit
Roll each die in the Strike Pool. Melee attacks use Close Combat checks. Ranged attacks use Ranged Combat checks.
Each passed check is a hit. Hits retain their color (Might hit or Skill hit).
- A natural 1 always misses.
- A natural 6 always hits.
Some rules modify the Hit attribute used for that attack — +1 Close Combat, −1 Ranged Combat, and similar. Apply these to Close Combat for Melee attacks and Ranged Combat for Ranged attacks (including Cast actions that use the Attack Sequence). Positive modifiers make checks easier; negative modifiers make checks harder.
Primary weapon
A fighter's primary weapon is the weapon they last attacked with this battle. If they have not attacked yet, their controlling player chooses which equipped weapon counts as their primary weapon when a rule requires it.
Step 3: Determine Criticals
Any natural 6 is a critical hit if any of the following apply:
- The attacker has weapon triangle advantage (see Weapon Triangle) — Sword, Axe, or
 Spear only
 - The attacker has magic advantage (see Magic Triangles)
- The attacker is using a firearm (crits against all targets)
- The attacker used the Aim action before that Ranged Attack Action
Critical hits cannot be blocked. Critical hits retain their color for tracking purposes.
If none of the above apply, 6s are normal hits.
Step 4: Defender Rolls Defense Dice
The defender builds a defense pool from their own Might and Skill:
- The defender's Might = Might defense dice
- The defender's Skill = Skill defense dice
Armor adds dice to this pool before rolling:
- Light Armor adds +1 Skill die
- Medium Armor adds +1 Might die
- Heavy Armor adds +2 Might dice and removes 1 Skill die
After applying armor, add any bonus dice from cover, Brace, spells, feats, or scenario rules.
Roll all defense dice as Defense (Df) checks — the same threshold applies to every die in the pool, regardless of color.
Blocking Hits
Each successful defense die blocks one hit of the matching color:
- Might defense blocks Might hits
- Skill defense blocks Skill hits
Defensive Maneuvers
An Active fighter may use successful defense dice for defensive maneuvers. Downed and Stunned fighters cannot use defensive maneuvers.
Dodge: When defending against a Melee or Ranged attack, spend 2 Skill defense successes to block 1 Might hit. If this fighter remains Active after all Wounds from the attack are applied, move them up to 2" directly away from the attacker. This movement can leave engagement range and can end within engagement range of another enemy fighter.
Shove: When defending against a Melee attack while within engagement range of the attacker, spend 2 Might defense successes to block 1 Skill hit. If this fighter remains Active after all Wounds from the attack are applied, push the attacker up to 2" directly away from this fighter. If this movement would bring the attacker into contact with terrain or another fighter, friendly or enemy, stop the movement at the point of contact. If this movement would push the attacker over a ledge or into open air, the attacker makes a Skill check. On a pass, stop the movement before they go over the edge. On a fail, they fall and resolve Falling, including any fall damage.
Defensive maneuver movement is not an action, reaction, Move, Retreat, or Charge. It does not trigger a Ranged Reaction, Companion co-movement, or the free Melee attack from a failed Retreat. This movement cannot move through another fighter's base and does not inflict hits or Wounds by itself. Except for the Shove check above, if defensive maneuver movement causes a fighter to fall, resolve Falling normally.
Ties
Compare your blocks to the attacker's hits by color. If blocks equal hits in a category — a tie — the attacker wins that tie and one hit of that color still gets through.
Shields
Shields modify the Defense (Df) threshold on specific dice in the defender's pool — raising it makes those dice easier to succeed, lowering it makes them harder:
- Buckler — +1 Df on 1 Skill die
- Shield — +1 Df on 1 Might die
- Tower Shield — +1 Df on 2 Might dice; −1 Df on 1 Skill die
Armor and shield effects stack. (See Equipment for full tables.)
Critical hits cannot be blocked.
Step 5: Apply Wounds
Apply Wounds
Resolve all unblocked hits from one attack together. Each unblocked hit inflicts 1 Wound.
- If an Active fighter is reduced to exactly 0 Wounds, they become Downed.
- If an Active fighter would be reduced below 0 Wounds, set them to 0 Wounds and they become Stunned.
- An unblocked hit on a Downed fighter pushes them to Stunned.
- An unblocked hit on a Stunned fighter pushes them to Out of Action.
Downed fighters defend with their full pool. Stunned fighters defend with Might dice only (no Skill).
(See Conditions for full Wound state rules.)
After Step 5, if a friendly fighter was at risk (in the line of fire or within engagement range of the target), any natural 1s in the Strike Pool hit that friendly — see Friendly Fire.
The Crit Triangle
Critical hits come from printed advantage rules. A natural 6 becomes a critical hit only when one of those rules applies.
Weapon Triangle
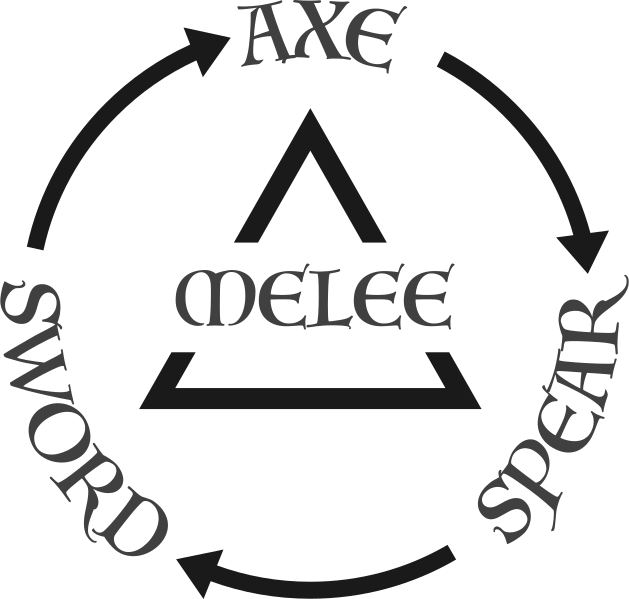
Having advantage over the opposing weapon type grants critical hits on natural 6s. Only Sword, Axe, and Spear participate in the triangle.
Magic Triangle
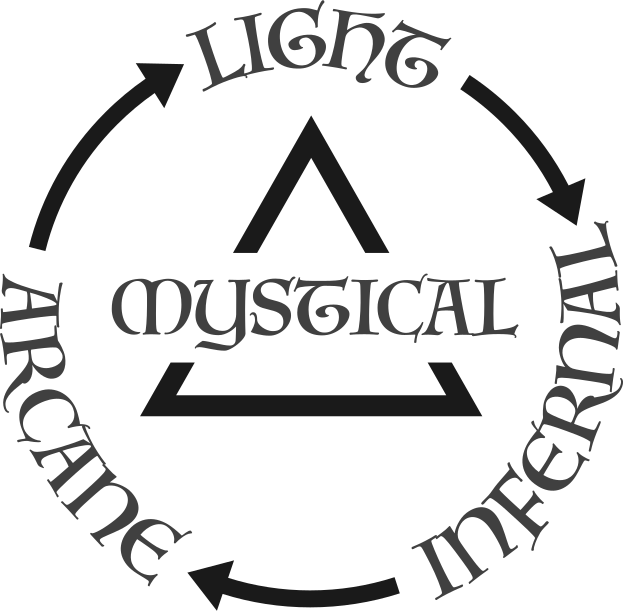
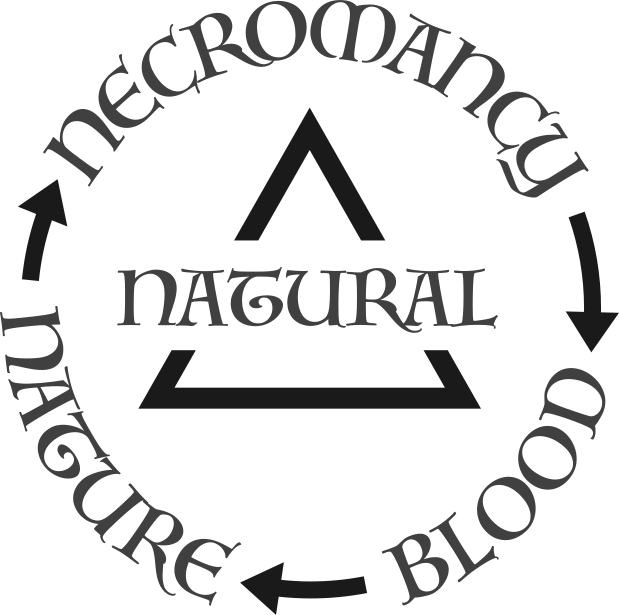
Two separate triangles govern magic vs. magic interactions.
Mystic Triangle
Natural Triangle
Firearms
Firearms are fired with the Ranged action. They use the primer roll and gain criticals against all targets, regardless of weapon type. A Long Rifle has Piercing, Heavy, and Impact — armor dice bonuses and shield Df bonuses do not apply when defending against its attacks, it cannot be fired if the fighter Moved or Charged this activation, and it makes exact takedowns become Stunned instead of Downed. (See Weapons — Keywords.)
Outside the Triangles
Hammer is outside the triangle. If either fighter wields a Hammer, weapon triangle advantage does not apply to that melee exchange — neither fighter scores triangle crits. (See Weapons — Keywords.)
The Aim action can also make natural 6 results critical hits on that fighter's next Ranged Attack Action during the same activation. If that Ranged weapon already scores critical hits on 6, Aim increases it to 5+.
Ranged Reaction
When a fighter is targeted by a Ranged Attack Action, the target may perform a single free action after the Attack Sequence is fully resolved. This reaction does not cost the target any of their normal actions.
- The reaction triggers whenever the target is selected as a target, regardless of whether the attack hits or misses.
- The target may select any single action from the action list (Move, Charge, Melee, Ranged, Brace, Retreat, etc.).
- If the target is Downed or Out of Action after the attack resolves, they may not react.
- A fighter may not perform a Ranged Reaction while their controlling player is activating fighters. The active player's fighters cannot react to return fire.
- Cast actions do not trigger Ranged Reactions. Only Ranged weapon attacks trigger this rule.
- If a fighter is targeted by multiple Ranged Attack Actions in the same activation (e.g., a Gunslinger firing both Pistols), the target gets one reaction per Ranged Attack Action.
- A Ranged Reaction cannot trigger another Ranged Reaction. Reactions only trigger from actions, not from other reactions.
Example: A Round
Two retinues clash in ruined tollhouse walls. The Phoenix Guard player has four fighters still standing (Active or Downed); the Grave Wardens player has six — activation counts 4 and 6.
Start of round. The Phoenix Guard have fewer activations, so they have initiative and receive 2 Pass tokens.
The Phoenix Guard player activates a crossbow wielding Squire first. He Aims, then performs a Ranged attack at an enemy Adept. The Adept survives and Moves behind cover — a Ranged Reaction after the shot resolves (See Ranged Combat).
The Grave Wardens activate an Acolyte, who Charges a Phoenix Guard spearman and uses a Melee action. The spearman takes a Wound but remains Active. On the Phoenix Guard player's next activation, the spearman Retreats and fails the check. The Acolyte's free Melee leaves the spearman Downed.
On their next turn to activate, the Phoenix Guard player spends a Pass token instead of selecting a fighter. The Grave Wardens activate another fighter. The Phoenix Guard must activate a fighter on their following turn before they can spend their second Pass token.
Activations continue until every eligible fighter has activated. Then round two begins — activation counts, initiative, and Pass tokens are reset.
Example: Combat
Attacker: Keen fighter (Close Combat 3, Might 3, Skill 4) wielding a Sword (+1 Might, +1 Skill)
Defender: Stout fighter (Close Combat 3, Might 4, Skill 3, Defense 4) wielding a Battle Axe (+2 Might), wearing Medium Armor
Step 1: Keen Strike Pool = (Might 3 + Sword 1) Might + (Skill 4 + Sword 1) Skill = 4 Might + 5 Skill = 9 dice
Step 2: Roll each die as a Close Combat check (CC 3, need 5+).
- Might die 1: rolls 5 → pass → Might hit
- Might die 2: rolls 2 → fail
- Might die 3: rolls 1 → auto-miss
- Might die 4: rolls 4 → fail
- Skill die 1: rolls 6 → auto-hit → Skill hit
- Skill die 2: rolls 5 → pass → Skill hit
- Skill die 3: rolls 4 → fail
- Skill die 4: rolls 3 → fail
- Skill die 5: rolls 5 → pass → Skill hit
Result: 1 Might hit, 3 Skill hits
Step 3: Sword vs Axe → Sword has advantage. The natural 6 on Skill die 1 is a critical Skill hit — it cannot be blocked.
Step 4: Build Stout's defense pool.
Base pool: Might 4 → 4 Might dice; Skill 3 → 3 Skill dice.
Medium Armor adds +1 Might die: pool becomes 5 Might + 3 Skill = 8 dice.
Roll all 8 as Df checks (Df 4, need 4+):
- Might die 1: rolls 5 → success
- Might die 2: rolls 2 → fail
- Might die 3: rolls 4 → success
- Might die 4: rolls 3 → fail
- Might die 5: rolls 6 → auto-success → success
- Skill die 1: rolls 4 → success
- Skill die 2: rolls 5 → success
- Skill die 3: rolls 2 → fail
Defense results: 3 Might successes, 2 Skill successes
Blocking: Compare by color.
- Might: 3 successes vs 1 hit → Might hit blocked. 2 Might successes remaining.
- Skill: 2 successes vs 2 normal Skill hits → tie. The Stout fighter has no shield, so the attacker wins the tie — 1 Skill hit still gets through. The 2 Skill successes block 1 of the 2 normal Skill hits.
- The 2 leftover Might successes are spent on Shove to block the remaining normal Skill hit. After Wounds are applied, Stout may move Keen up to 2" directly away.
- The critical Skill hit cannot be blocked.
Step 5: 1 unblocked hit (the crit). The Stout fighter takes 1 Wound (3 → 2).